Let’s talk about something that’s been on my R&D wishlist since 2023: Microsoft Entra Identity Governance and its powerful workflows. Onboarding and offboarding employees can be tedious and prone to errors. Many organisations still rely on manual processes via standard operating procedures (SOPs). And humans being humans, mistakes are inevitable.
Alternatively, some write large custom PowerShell scripts, which take time to develop, require ongoing maintenance, and often lack flexibility as business needs evolve.
Enter Microsoft Entra Identity Governance—a game-changer for automating these processes quickly and efficiently. No scripting. No third-party apps. Just a few clicks, and you can automate your users’ lifecycle. What’s more, it’s modular, allowing you to easily add extra steps to workflows via a user-friendly GUI.
All you need is an Entra ID P2 license (formerly Azure AD P2) and the Identity Governance add-on for just $6 per tenant per month.
Let’s dive into how Entra Lifecycle Workflows can streamline your onboarding and offboarding processes in Microsoft 365 while enhancing security, compliance, and operational efficiency.

Why Automate User Lifecycle Management?
When onboarding and offboarding tasks are done manually, there’s a high risk of:
• Errors: Forgetting to revoke access to sensitive systems can lead to data breaches.
• Delays: Employees may wait hours (or days!) for access to essential tools.
• Compliance risks: Without proper audit trails, you could fail to meet regulatory requirements.
Automation eliminates these challenges, ensuring consistency, speeding up execution, and bolstering security.
Step-By-Step Onboarding workflow
This is a theoretical example; adjust it to fit your organisation’s specific needs and SOPs.
When onboarding a user, you need to ensure:
• The user account is provisioned with the correct licences.
• The user is informed of their credentials securely (never send passwords via email).
• Appropriate group memberships (e.g., AD groups, shared mailboxes, Microsoft 365 groups) are assigned.
• Their mailbox is configured correctly.
• MFA enrolment is initiated.
Onboarding in 5 Steps
- Access the Entra Admin Centre:
- Navigate to the Microsoft Entra Admin Centre
- Go to Identity Governance > Lifecycle Workflows

- Create an Onboarding Workflow:
- Click + New Workflow and select the Onboarding template.
- Give the workflow a meaningful name, such as “Onboarding Workflow.”

- Set the Trigger:
- Use Group Membership Changes as the trigger. Adding a user to the “OnboardUser” group can initiate the workflow

- Configure Onboarding Tasks. Here’s what can be automated:
- Enable the Account: Activate the new account as part of the workflow.
- Add to Groups: Assign users to the relevant Microsoft Entra groups for resource access.
- Generate Temporary Access Pass (TAP): Provide secure first-login access without needing MFA or a physical token.
- Send a Welcome Email: Include their TAP and onboarding resources, prompting the user to reset their password and enrol in MFA.
- Assign Licences: Automatically allocate the appropriate Microsoft 365 licences.
- Send an Onboarding Reminder Email: Notify the user’s manager about their start date.
- Run a Custom Task Extension: Trigger a logic app or other scripted tasks for advanced needs.

- Test, Monitor, and Refine:
- Use test accounts to validate the onboarding process. Monitor the dashboard for workflow errors and refine the steps as needed.
Transition: From Manual Triggers to HR Integration
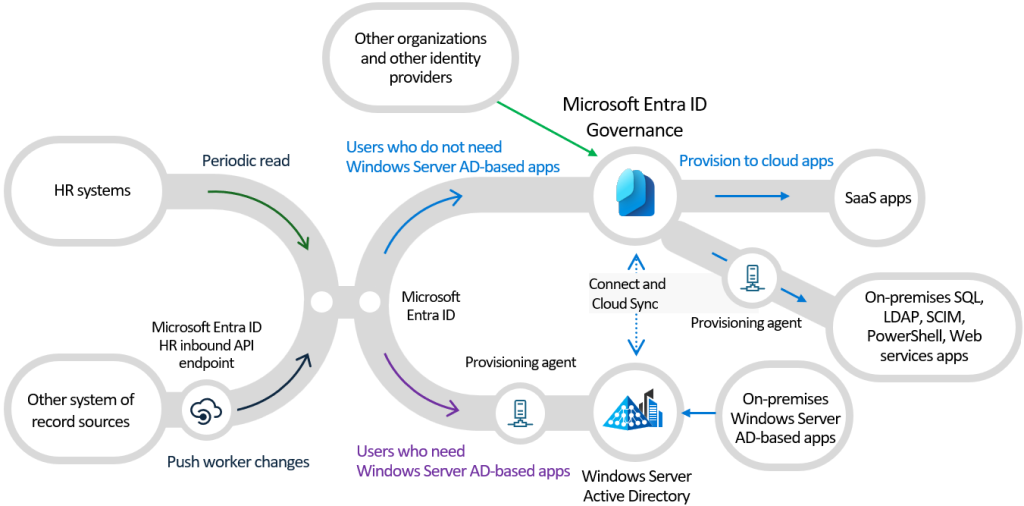
As you can see, I’ve selected Group Membership Changes as the trigger type. This approach requires a manual step where a user is added to an enrolment group to initiate the workflow. Once added, the workflow is triggered automatically.
However, when creating the new account, you have the option to disable it initially, allowing the workflow to remain in a waiting state until you are ready to proceed.
For a more streamlined solution, consider HR-driven provisioning. If supported, your HR team can initiate the process directly from their HR system, such as SAP HCM, SAP SuccessFactors, or Workday. This approach eliminates manual intervention, ensuring a smoother and more integrated onboarding experience.
Step-By-Step Offboarding workflow
When an employee leaves, their access to company resources must be revoked immediately, while their data is archived securely per company policy. Entra Lifecycle Workflows ensure no step is missed.
Offboarding in 5 Steps
- Access the Entra Admin Centre:
- Navigate to the Microsoft Entra Admin Centre.
- Go to Identity Governance > Lifecycle Workflows.
- Create an Offboarding Workflow:
- Click + New Workflow and select the Offboarding template.
- Give the workflow a meaningful name, such as “Offboarding Workflow.”
- Set the Trigger:
- Use Group Membership Changes as the trigger. For example, adding a user to the “OffboardUser” group can initiate the workflow.
- Configure Offboarding Tasks; Automate the following:
- Disable the User Account: Block sign-ins and secure their profile.
- Remove Teams Memberships: Automatically remove the user from Teams chats and groups.
- Unassign Group Memberships: Remove the user from all AD and Microsoft 365 groups.
- Revoke Licences: Deallocate their licences to save costs.
- Access Package Revocation: Revoke entitlements granted via Microsoft Entra entitlement management.
- Run a Custom Task Extension: For instance, trigger a script to convert their mailbox into a shared mailbox.
- Test, Monitor, and Refine:
- Test the workflow on a dummy user to ensure all tasks execute correctly. Use the dashboard to track workflows and adjust configurations as necessary.
Custom Extensions
For organisations with unique requirements, Microsoft Entra Identity Governance offers the flexibility to add Custom Extensions to your workflows. This capability allows you to integrate advanced automation tasks, such as converting user mailboxes to shared mailboxes, by leveraging Azure Logic Apps or Azure Automation Runbooks.
Why Use Custom Extensions?
While Lifecycle Workflows handle standard tasks, custom extensions can address more complex scenarios, such as:
- Converting a departing user’s mailbox to a shared mailbox.
- Performing additional cleanup in third-party systems.
- Integrating with internal tools or workflows.
How to Add a Custom Extension
- Prepare Your Automation Script or Logic App
- For Azure Automation Runbooks: Write a PowerShell script for your task (e.g., converting mailboxes). Test it thoroughly in the Azure Automation environment.
- For Azure Logic Apps: Design a Logic App workflow that performs the desired action, such as calling the Microsoft Graph API to manage mailboxes.
- Example PowerShell snippet for converting a user mailbox to a shared mailbox:
# Connect to Exchange Online
Connect-ExchangeOnline
# Convert user mailbox to shared mailbox
Set-Mailbox -Identity "<UserEmail>" -Type Shared- Integrate the Extension into Lifecycle Workflows
- Navigate to Lifecycle Workflows in the Entra Admin Centre.
- Open the workflow where you want to add the custom extension.
- Under Tasks, click + Add Task and select Run Custom Extension.
- Link the Automation
- Choose either an Azure Logic App or an Azure Automation Runbook as the target for your custom extension.
- Provide the necessary details, such as the Logic App’s HTTP endpoint or the Runbook’s configuration.
- Ensure permissions are correctly configured for Entra Identity Governance to trigger the automation.
- Set Input and Output Parameters (Optional)
- If your Logic App or Runbook accepts input parameters (e.g., UserPrincipalName), map them appropriately within the workflow.
- Test the Extension
- Run the workflow on a test account to verify the custom extension executes as expected. Check the logs in Azure to troubleshoot any issues.
More Reasons to Love Entra Lifecycle Workflows
- Enhanced Security: Reduce human error, ensuring departing employees lose access to sensitive systems immediately.
- Compliance Made Easy: Comprehensive logs and audit trails simplify meeting GDPR, ISO, and other regulatory standards.
- Scalable and Consistent: Onboard and offboard employees consistently—whether it’s one or 1,000 users.
- No Scripting Required: Traditional automation tools rely on PowerShell or custom apps. Entra workflows deliver the same functionality with a user-friendly GUI.
Ready to Automate?
There’s no reason to spend countless hours on repetitive tasks like onboarding and offboarding. With Microsoft Entra Identity Governance, you can automate these processes in under 15 minutes. And the solution is modular & elegant.
If your organisation already uses Entra ID P2, enabling the Identity Governance add-on for just $6 per tenant per month gives you all the tools you need to get started.
Start your journey to a more secure, compliant, and efficient identity lifecycle today by visiting the Microsoft Entra Admin Centre.

