In many organisations, administrators need to receive critical email notifications from Microsoft Entra and other Microsoft 365 systems. While assigning a productivity license to admin accounts is a quick solution, it introduces unnecessary risks. Privileged accounts with licenses are more vulnerable to phishing and social engineering attacks.
Fortunately, you can avoid these risks by using plus addressing to enable admin notifications without assigning an email license. This method ensures security and keeps admin emails flowing seamlessly.
Understanding Plus Addressing in Exchange Online
Exchange Online’s plus addressing feature lets you create email aliases by appending a “+” and a tag to an existing address. For example, admin+notifications@yourdomain.com is treated as a unique email address but routes messages to the primary mailbox. This is a simple, effective way to separate and organise incoming emails.
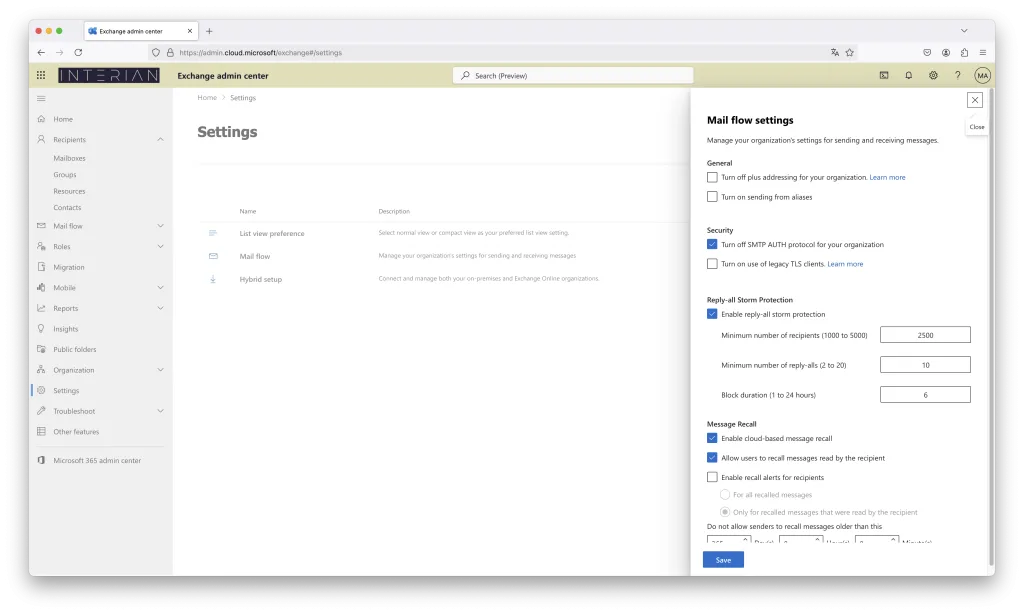
Plus addressing is already enabled by default in Exchange Online. To confirm:
- Log in to the Exchange Admin Centre.
- Navigate to Settings > Mail flow.
- Verify that the Turn off plus addressing for your organisation checkbox is not selected.

If needed, administrators can disable plus addressing for the organization using PowerShell commands. However, it’s recommended to keep it enabled for its flexibility and simplicity.
Assigning a Plus Address to Your Admin Account
To set up a plus address for your unlicensed admin account, follow these steps:
- Log in to the Microsoft Entra admin centre.
- Go to Identity > Users > All users.
- Select the admin user, then click on Properties > Edit Contact Information.
- Add your plus address to the Email contact field and click Save.
Alternatively, you can use Microsoft Graph PowerShell to do this. If you haven’t installed the latest Microsoft Graph PowerShell SDK, check out this article: How to Install the Microsoft Graph PowerShell Module.
Here’s an example of the command to assign the plus address:
Connect-MgGraph -Scope User.ReadWrite.All
Update-MgUser -Userid demoadmin@yourdomain.com -Mail adelev+Approval@yourdomain.com
Once done, you should see that the email field for your admin user contains the new plus address.
Testing Email Notifications
After configuring the plus address, it’s time to test the flow of email notifications. In this example, let’s assume we’ve created an access package approval named ‘DemoPackage1’, where the admin user (configured with the plus address) is the approver.
- As an external user (e.g.,
dan@yourdomain.com), request access to DemoPackage1. - The approval request triggers the approval flow, sending an email notification to the plus address you configured (e.g.,
adelev+approval@yourdomain.com).
The email is routed to the regular user’s mailbox, such as adelev@yourdomain.com, without the need for assigning a mailbox license to the admin account. This ensures that admin notifications are properly received and handled.
Plus addressing in Exchange Online has been available since 2020, but many organizations are still unaware of this feature and its benefits. By leveraging this built-in functionality, you can enhance security, reduce costs, and streamline email notifications without assigning unnecessary licenses to admin accounts.
For more details, visit Microsoft’s official documentation on Plus Addressing in Exchange Online.

